Creating a Basic, Always On, Mobile Compatible IPSEC VPN
For a while, i’ve wanted to create a working always-on VPN from my phone back to my internal network. Partly to be able to access my network resources from anywhere, but also to provide additional security while out and about. WiFi hotspots are well known for their weaknesses, but increasingly mobile data connections are also at risk, with most mobile providers required to keep connection logs and also other instances of mobile providers tampering with data and adding tracking cookies.
For the purposes of this article, we’re going to use Android 5.0.1 as our VPN client and Ubuntu 14.04 LTS as our VPN host. However, the steps in this article should also be applicable to other versions of Android, iOS devices and other Linux based distributions. A number of VPN protocols exist, but this article will use IPSEC – a widely adopted standard. Other protocols are available, but their security and compatibility varies. The key requirements for this project are;
- Security – the VPN implementation must not use weak cryptographic standards.
- Compatibility – The VPN implementation must be available out of the box on the client device.
- Always-on – The VPN implementation must be supported in an Always-on fashion, prohibiting any data from flowing until the connection is established.
When these requirements are applied to our Android client, this limits us to using either an IPSEC or L2TP over IPSEC VPN. For simplicity, we’ll use a pure IPSEC solution.
IPSEC is highly versatile and supports a huge range of encryption protocols and authentication methods. This article will aim to create a simple implementation though and use a pre-shared key with usernames and passwords for authentication. Later articles will build on this to add certificate based authentication. The aim is to get a simple but reasonably secure implementation working first.
Originally, I wanted to get this working on my OpenWRT based router, but due to the complex iptables firewall and NAT arrangements, I was unable to get traffic to leave the router. Instead, a Ubuntu VM inside my network is handling the connectivity.
Network Diagram
Diagrams always make things easier to understand!
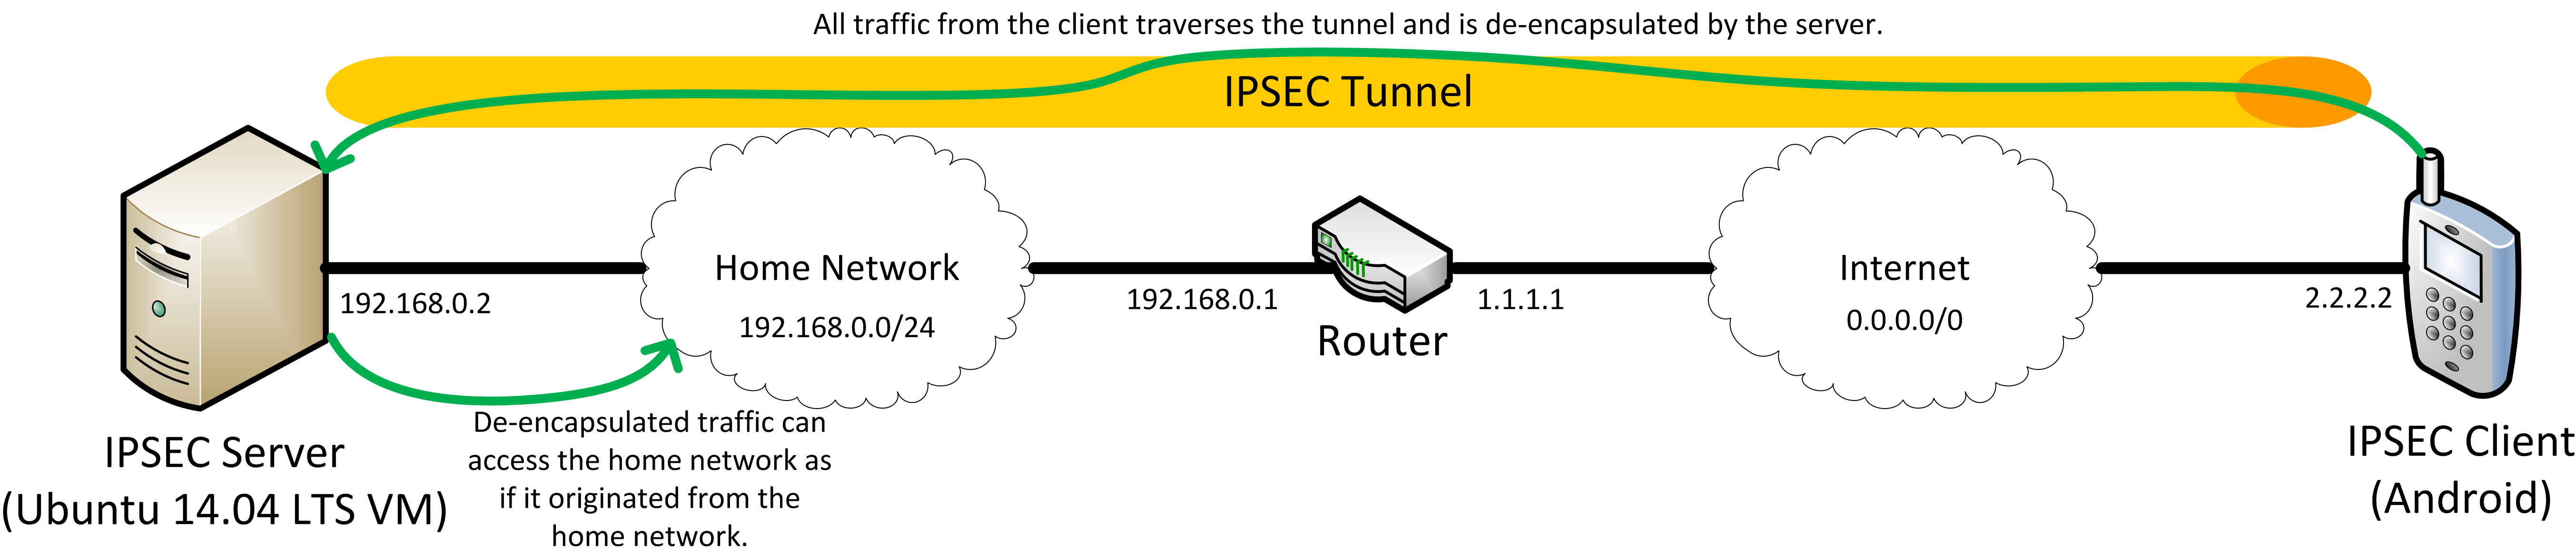
IPSEC tunnel between mobile client and server inside home network.
Arguably, this diagram is somewhat simplified. For example, the client has a public IP. On almost all mobile networks, you’ll have an RFC 1918 non-routable IP and go through some form of NAT in order to reach the internet. Historically, this presented an issue for IPSEC VPNs which assume both endpoints have a publicly routable IP. However, more recent implementations have the ability to encapsulate IPSEC packets to make them more friendly to NAT. This is also applicable to our server, which is also in a RFC 1918 non-routable IP address space.
Router Port and Protocol Forwarding
As our server is behind a router performing NAT, our client won’t be able to connect unless we tell the router which ports to forward. Ensure you’ve assigned your server a static IP address and forward the following ports and protocols.
- Port 500 UDP
- Port 4500 UDP
- IP Protocol 50 (ESP)
- IP Protocol 51 (AH)
If you can’t forward IP Protocols, it shouldn’t pose a problem – most IPSEC VPNS will fall back instead to NAT-T over UDP Port 4500.
Server Configuration
- Install the strongswan package, along with the plugins xauth-generic, dhcp and farp by running apt-get install strongswan strongswan-plugin-xauth-generic strongswan-plugin-farp strongswan-plugin-dhcp .
The auth-generic plugin allows us to use xauth for authentication, the farp plugin allows our client to appear as a normal host on the remote network and the DHCP plugin allows the client to be assigned an IP from the remote network’s DHCP server rather than randomly assigning an IP from a set pool and hoping that it doesn’t collide!
- Edit /etc/ipsec.conf to read as follows;
conn %default

conn psk
        left=%localhost
        leftsubnet=0.0.0.0/0
        leftfirewall=yes
        right=%any
        rightsourceip=%dhcp
        xauth=server
        authby=xauthpsk
        keyexchange=ikev1
        auto=add
        ike=aes128-sha1-modp1024!
        esp=aes128-sha1!
This tells the server to;
- Use the localhost address as the “left” side of the connection.
- Add any required firewall/iptables rules automatically.
- Accept any address as the “right” side of the connection.
- Assign virtual IP addresses to clients from DHCP.
- Use self as an xauth source.
- Use a pre-shared key for xauth.
- Use IKEv1 for Key Exchange (IKEv2 is better, however Android’s out of the box IPSEC client only supports IKEv1).
- Use AES-128 for encryption and key exchange with SHA1 as a hash and Diffie Hellman Group 2. This provides a good level of security – you can use higher standards if you wish, but this is already “good enough” against a current adversary. This Security Stack Exchange answer does a good job of explaining why AES128 is good enough. It would be better to use AES with the GCM cipher, but unfortunately the built-in Android VPN client does not support it.
Save the file and quit.
- Edit /etc/ipsec.secrets to read as follows;
username : XAUTH "password"
%any %any : PSK "presharedkey"
Replace username with a username you want your connecting client to use, replace password with an appropriate strong password and replace presharedkey with an even stronger password. While initally setting this up and testing, you may wish to use shorter and weak passwords but as soon as it is working change to using strong passwords. Without a strong password and pre-shared key the security that a VPN offers is just an illusion.
Save the file and quit.
- Restart the IPSEC server in order to load the new configuration using ipsec restart .
- Enable IP forwarding, without this your client will only be able to communicate with the IPSEC server. To do this edit /etc/sysctl.conf and uncomment the net.ipv4.ip_forward=1 line. Run sysctl -p to apply the change. This will persist across reboots.
- Finished! Your server should now be accepting IPSEC connections and forwarding any data.
Resolving Android MTU Issues
Unfortunately, Android relies on Path MTU direction across the tunnel to negotiate the correct MTU size with the destination server. Whilst PMTU is a good idea, across the internet it can be somewhat fragile as many firewalls are configured to drop ICMP traffic – including PMTU ICMP traffic! Consequently, Android falls back to using an MTU of 1500, which is far too big for packets going through the tunnel. Consequently, unless the MTU is changed, some communications won’t work – notably those which rely on transferring large amounts of data such as images on Twitter and Speed Test applications.
Fortunately, Zeitgeist has identified an easy work around using iptables. By using the following iptables rule, any packets with a large MTU can be re-written to have a more sensible one;
iptables -t mangle -A FORWARD -o eth0 \
	-p tcp -m tcp --tcp-flags SYN,RST SYN \
	-m tcpmss --mss 1361:1536 \
	-j TCPMSS --set-mss 1360
Of course, this will apply to any traffic traversing the eth0 interface – VPN traffic or otherwise. If your server is only being used as a IPSEC VPN server this may be acceptable, otherwise you may wish to use the -s flag with a suitable netblock to only apply to traffic from your VPN clients.
Importantly, iptables rules applied in the fashion above do not persist across restarts. I highly suggest you use the iptables-persistent package to preserve your iptables rules across restarts.
You should also disable Path MTU discovery. Zeitergist suggests doing this by altering the proc filesystem, but a more permanent solution can be obtained by editing the sysctl.conf file as before to enable IPv4 forwarding.
- Edit /etc/sysctl.conf and add the line net.ipv4.ip_no_pmtu_disc=1 line. Save the file and exit.
- Run sysctl -p to apply the change. This will persist across reboots.
Client Configuration
As mentioned previously, these instructions are based off an Android 5.0.1 device, but should be applicable to other versions of Android and iOS with slight modifications.
- Enter the VPN settings via Settings > Wireless & networks > More > VPN.
- Add a new VPN connection by tapping the plus icon.
- In the Name field, enter a user-friendly name for your VPN connection.
- In the Type drop-down, select “IPSec Xauth PSK”.
- In the Server address field, enter your router’s public IP or hostname.
- Leave the IPSec identifier field blank.
- In the IPSec preshared key field, enter the preshared key from your ipsec.secrets file.
- Tap Save.
- Tap on your new VPN connection to start connecting. When prompted, enter your username and password from your ipsec.secrets file, optionally save the account information and tap connect.
- If working, you should see the comment under your VPN’s name change to “Connected” and see a key icon in your notification area.
Enabling Always On
Now that your VPN is working, the always-on mode can be enabled. This will force the VPN to be connected at all times and block any data traffic until it has been connected – much easier than having to remember to connect each time.
- Enter the VPN settings via Settings > Wireless & networks > More > VPN.
- From the menu, select “Always-on VPN”.
- Select the name of the VPN profile you just created, and then tap OK.
After enabling as an always-on VPN, it should attempt to connect automatically and you’ll get a notification in the notification area.

Always on VPN notification.
The “Reset” action is useful if the VPN connection goes stale, which can occasionally happen.
Troubleshooting
Although IPSEC is a nice, standardised protocol, it can be very unforgiving to configuration issues. Viewing the log live while attempting to connect can be very useful in identifying connection issues. To do this, run tail -f /var/log/syslog .
no IKE config found for 1.2.3.4…5.6.7.8, sending NO_PROPOSAL_CHOSEN
This error indicates that none of your configuration entries matched the connection that was attempted. This is normally caused by a few things;
- Your configuration specifies IKEv1, but you’re using an IKEv2 client or vice-versa.
- Your left or right definitions are wrong – try temporally changing them to %any and $any.
no matching proposal found, sending NO_PROPOSAL_CHOSEN
Similar to above, this error indicates that your client and server couldn’t agree on a configuration. This error however is more likely to occur if your client and server don’t agree on what encryption mechanisms are possible for IKE and/or ESP, for example you’ve configured the server to only permit AES256-GCM-16, but your client can only do plain old AES256-CBC (Android, i’m looking at you). The lines above this error in the log should show what mechanisms your client supports.
no shared key found for ‘1.2.3.4’[1.2.3.4] – ‘(null)'[5.6.7.8]
This error indicates that a matching pre-shared key for this combination of server and client wasn’t found in the ipsec.secrets file. Either use %any %any or make sure they match your left and right definitions.
no XAuth method found
This error indicates that although you requested xauth authentication in your IPSEC server configuration, no way of performing it was known to the server. Make sure you’ve installed the strongswan-plugin-xauth-generic package.
Once connected over the VPN, some data connections fail.
This is likely because of the MTU issue listed earlier. Make sure you’ve got the iptables rule applied and that Path MTU discovery is disabled.
Conclusions
Hopefully this article was a useful reference for creating a simple but reasonably secure VPN for mobile devices. Future articles will build upon this base article to add additional functionality, such as certificate based authentication rather than usernames, passwords and pre-shared keys.
If you’ve run in to any problems, please note them in the comments so the article can be updated.


