Intel NUC Internal CEC Adapter by Pulse Eight Review
Pulse Eight recently released a new internal CEC adapter designed especially for use in Intel NUCs. I’ve used their external one for some time so that I can use my TV’s remote to control Kodi on the NUC and automatically switch HDMI inputs – it’s super convenient. However, it does consume an extra USB port, so I leaped at the chance to convert to using their new internal adapter instead. Postage was quick, I had the adapter in my hands the very next day and set about installing it.
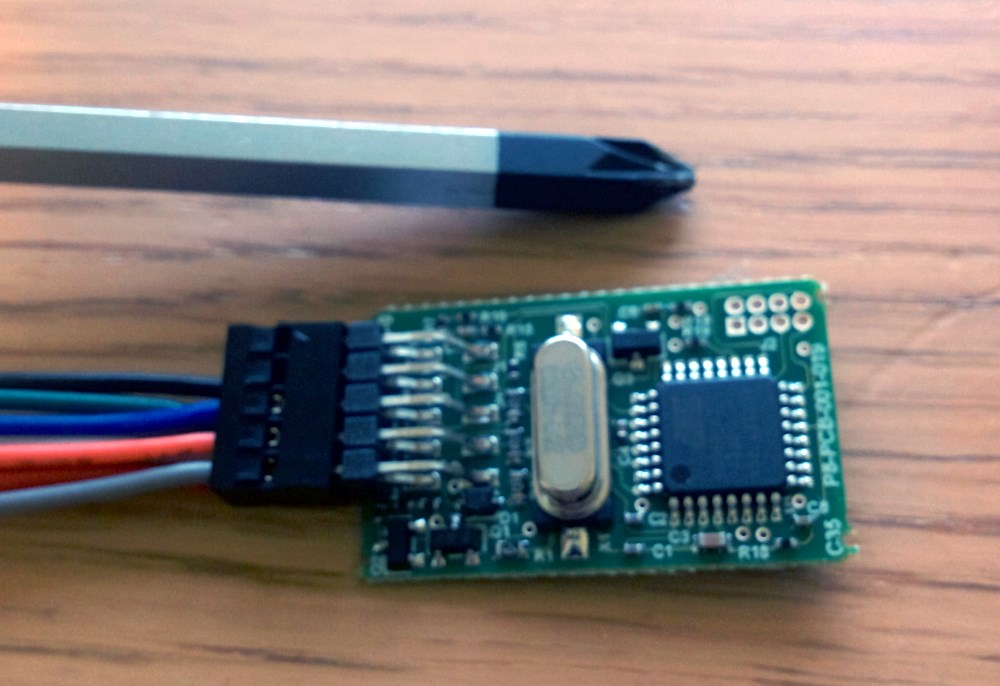
The Pulse Eight Internal CEC Adapter for Intel NUCs, with screwdriver for scale. It’s really tiny!
The adapter works by connecting to the following headers on the NUC’s motherboard;
- The USB headers – for power and data.
- The Front Panel header – to be able to trigger a press of the power button to switch on the NUC.
- The Custom Solutions header – to be able to communicate via CEC over the HDMI cable.
Pulse Eight provide a wiring loom to connect the adapter to the NUC, with each individual cable having a separate connector so that they can reach each of the different headers. The downside of this however is that you need to consult the NUC’s documentation to find out exactly which part of the header is, for example, the USB data+ channel. Thankfully, for my NUC (D54250WYK) Intel have published a Detailed Product Specification document which lists all of the header pinouts. The documentation included with the adapter is unfortunately somewhat sparse, simply stating (to paraphrase) “connect these coloured cables to this header”. It would have been very useful if they had included instructions on exactly which connector needed to be connected to each part of the header, rather than forcing users to try and find the header pinouts. However, i’m guessing this was not done so that one package could be used across the (many) models of NUCs out there. The documentation I received also had a small error in it, with the USB and Custom Solutions headers being labelled the wrong way around. A small note included with the adapter points this out, and Pulse Eight have confirmed that the correct documentation is being reprinted at the moment.
On my NUC, the USB and Front Panel headers are on the top of the motherboard, which means it’s reasonably simple to connect them. However, the Custom Solutions header is on the underside of the motherboard, which is not so easy to get to. After removing the cover, two more screws need to be removed from the motherboard. While the motherboard is now loose, it’s really hard to remove. I found that I needed to apply some force to the Ethernet port whilst simultaneously flexing the rear of the case – it won’t flex much but it only needs to flex a small amount in order for the motherboard to pivot upwards.
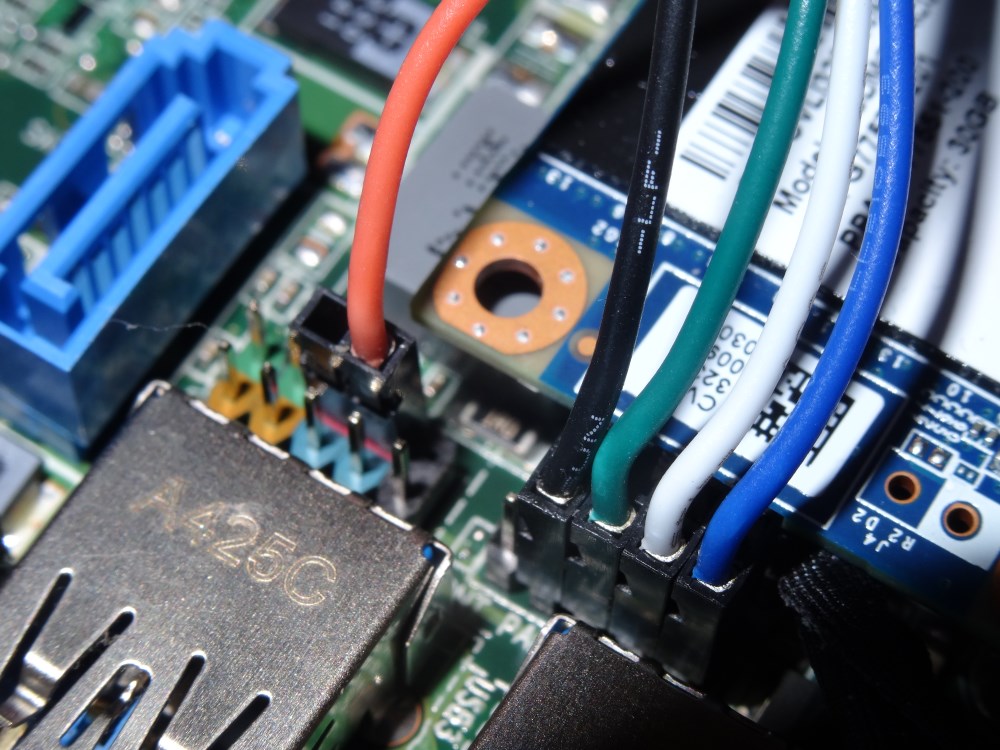
USB (r) and Front Panel (l) Header connections.
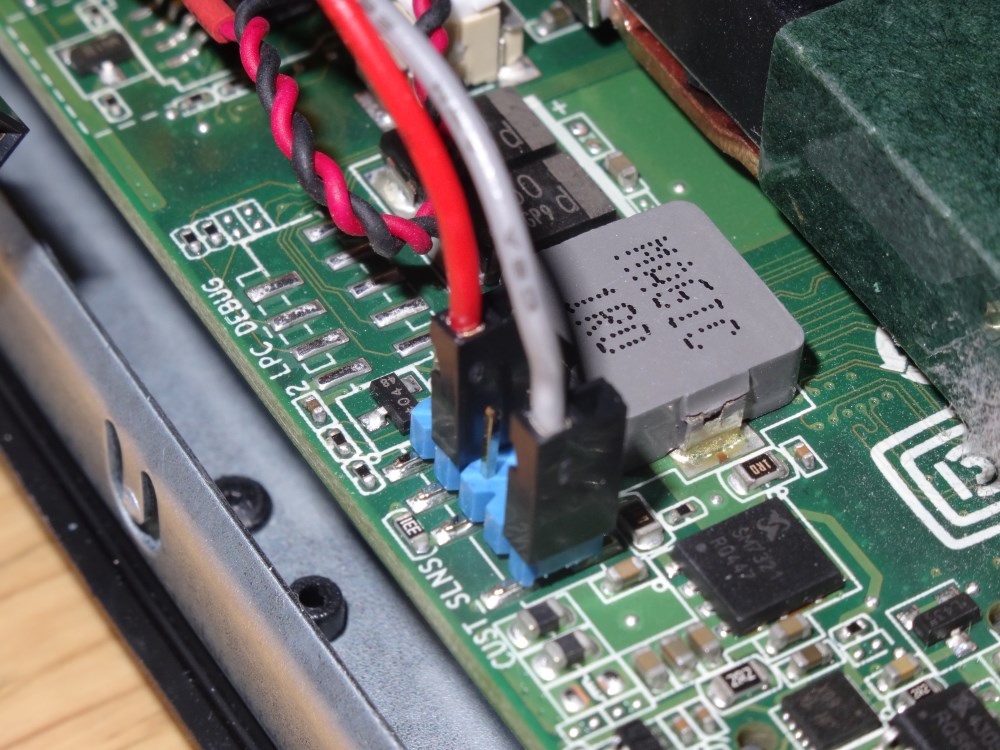
Custom Solutions Header connections.
Although not hugely problematic, the cables are extremely tight. An extra centimeter or two of length would have made it much easier to route the cables between the various connectors. The suggested mounting for the adapter is on top of the Ethernet port shield, however I found that I had to mount it slightly off it so that the bottom of the case would fit on correctly again.
Once connected and reassembled, Ubuntu and Kodi immediately picked up the new adapter and it worked flawlessly in conjunction with my TV just as the old external adapter did.
Conclusions
Whilst installation can be somewhat fiddly and difficult, once installed the adapter performs extremely well without needing to consume any external USB ports and keeping the sleek looks of the NUC intact. The installation could be made simpler if the documentation was more comprehensive (and correct), but with the correct documentation, Intel’s Detailed Product Specification document and the tips above about removing the motherboard, it should be reasonably simple for anyone to install.
The internal adapter is £10 cheaper than the external adapter so unless you’re looking to be really lazy I would strongly recommend the internal adapter over the external one. The functionality between them is exactly the same.
The adapter can currently be purchased directly from Pulse Eight’s website for £20, with free postage in the UK.


What settings do you have for the libcec in kodi? I’m having problem even with the external adapter. I have intel NUC with kodi on Ubuntu Trusty.
One thing to double check – by default on Ubuntu i’ve found that the serial port used to communicate with the CEC adapter has restricted permissions and so Kodi can’t access it. This can be confirmed by looking in Kodi’s log for;
ERROR: CecLogMessage - error opening serial port '/dev/ttyACM0': Permission deniedThe default permissions on
/dev/ttyACM0arecrw-rw---- 1 root dialout, so if you’re running Kodi as a normal user it won’t be able to communicate with the adapter. The best way to solve this is to add your user that you run Kodi with to the dialout group usingusermod -a -G dialout USERNAME.Thank you so much for this! I was so frustrated with the instructions that came with it. Mainly I am a software developer, network and Linux geek, but I have done a lot of building, repairing and modifying of computers.
Finally after finding your blog post, I was able to put the connectors in the right place. First of all, you are right about the screws. The instructions say that it is enough to remove the four screws on the bottom the reveal the board, but I immediately saw that there were two more, smaller black screws I had to take out. Removing the board is really hard, and you have to push the ports from the outside, bend the chassis a little bit and then just wiggle it around, using a scary amount of pressure (it is like more screws are holding it back in place, but I knew thanks to some googling that it is enough, and I also know computer components can cake more force than people think).
I got the board out and was completely lost with the instructions. It says connect the black, blue, green and white cables, but the order is black, green, white and blue, like in your picture. And where to put the red cable, well, there was no help from the instructions other than on the picture which was not accurate at all. Then there is the problem of where to connect the cables under the board, the orange and grey cables. It is not explained at all, except from the picture which again does not help at all. Thanks to your picture I got it working. The first times I was just guessing and Linux just gave me USB errors or booted with no new USB devices detected.
So thank you! :-)
I will add some details to make people find this post more easily when googling:
How to install the Intel NUC HDMI-CEC Adapter (internal), check out this blog post and my comment.
My model: D34010WYK
Actually it is: D34010WYKH2 (with room for a SSD/HDD).
The product from Pulse Eight I bougt was this:
https://www.pulse-eight.com/p/154/intel-nuc-hdmi-cec-adapter
Forget about the instructions that come with it. They are useless.
Thanks for this. It is so much better than the rubbish instructions that come with it. I bought mine last week and it still shows the headers the wrong way around for a D34010WYKH2. The problem I have is that my NUC is in a custom TranquilPC case and already has a pin in the Front Panel header (6 or 8?) which is connected to the power button on the case. I am guessing that without this attached the NUC won’t be able to power on when the HDMI port is selected?
I’m afraid i’m not entirely sure but I would expect that would be the case. I leave my NUC on 24/7 to sync media in the background so i’ve never actually powered it on over CEC!
Thanks KingJ. i am going to return it and just get a usb one i think. It would be a real pain getting the motherboard out of the case anyway to get at the cec pin behind it.