Shrinking Thin-Provisioned ESXi Disks
Thin-provisioned disks can be pretty useful in ESXi. There’s no need to pre-allocate storage or have huge amounts of unused, but allocated, storage sitting idle. However, whilst thin-provisioned disks can semalessly grow themselves, they cannot be shrunk as easily. For example, if you wrote 10GB of data to a thin-provisioned disk and then deleted it, although from the VM’s perspective the space is now ‘free’, from the perspective of the physical disk that the thin-provisioned VMDK is provisioned on the 10GB of data is still there.
It is however possible to shrink the VMDK back down to the actual size of data that is being used, but this is an offline operation which will require downtime. At a high level, it’s rather simple – use zerofree to change any ‘free’ sectors of the virtual disk to zero, and then use vmkfstool’s punchzero option to free up those zeroed sectors from the physical disk, thus reducing the size of the thin-provisioned disk on the physical disk.
- Shut down your VM.
- Boot your VM from the GParted Live CD. Other distributions will also likely work so long as they have the zerofree utility, but the important distinction here is that we need to boot from a different medium to the disk the VM would normally boot off as this procedure won’t work if the disk is mounted/in use.
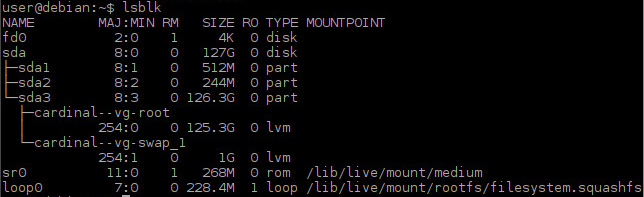
- Use lsblk to identify the name of your disk. In my case, as shown in the screenshot, my disk is /dev/mapper/cardinal–vg-root as evidenced by the large size and the LVM partition type.
- Run zerofree on the disk identified in the previous step, e.g. sudo zerofree -v /dev/mapper/cardinal–vg-root . Zerofree will now start finding any unallocated sectors on your VM’s disk and change them to zero. Depending on the size of your disk this may take some time, if you used the -v flag, you will get an percentage update on progress.
- Safely shutdown your VM using the Exit button on GParted Live’s desktop.
- Connect to your ESXi server using SSH.
- Run vmkfstools –punchzero /path/to/vmdk/disk.vmdk against your VM’s VMDK file. You can find your datastore at /vmfs/volumes , and inside the datastore folder you’ll find your VM folders, and inside that should be your VM’s VMDK file (unless you’ve changed the default storage path for your VM’s VMDK files). You will likely have a VMDK file with the same name as your VM and also one with a -flat suffix. Make sure you run vmkfstools against the main VMDK, not the one with the -flat suffix. This operation will also take some time, but it will give you a percentage update on progress.
- All done! Start up your VM again, booting as normal.
Instead of zerofree, it’s also possible to use dd to zero out the space. However, dd will zero out all of the unallocated space too, thus growing your thin-provisioned disk to its maximum size! Using zerofree to only zero the unused but still allocated space is both quicker and ensures that your disk grows no larger than it currently is during the shrinking process.


Thank You!