Upgrading a etcd Cluster from Version 2.3 to Version 3.0 on CoreOS Container Linux
The recent 1.6 release of Kubernetes strongly encourages switching etcd to etcd3. However, if you have an existing etcd2 cluster, the documentation CoreOS provides on upgrading it is less than helpful. Although it documents the upgrade procedure, it doesn’t tell you how to actually switch from running etcd2 to etcd3 – simply saying to drop in the new etcd3 binary in place of the etcd2 one. If you’re running on CoreOS’s Container Linux however this isn’t possible due to the read only file system and a different method needs to be used. If you’re looking to undertake a similar upgrade, hopefully the following steps will help.
Assumptions
This guide makes the following assumptions about your infrastructure;
- You are running a multi-node etcd cluster, currently running version 2.3.x.
- You are running etcd on CoreOS Container Linux.
- Your version of CoreOS Container Linux is up-to-date.
- You are currently using the etcd2 unit to run the cluster.
Upgrade Process
Kubernetes Shutdown
To ensure as little change as possible to etcd during the upgrade process, shut down all Kubernetes masters and workers. Although is is technically possible to put etcd in to a read-only state and continue to run Kubernetes during the upgrade, this is beyond the scope of this guide and brings in additional complexity. If you can tolerate the downtime, shut down Kubernetes. If you can’t tolerate the downtime, you may want to engage CoreOS professionally to assist with the process!
Health Check
Before beginning, ensure that your etcd2 cluster is healthy using the command etcdctl cluster-health . The output should confirm that all nodes are responding and that the overall cluster health is healthy.
core@etcd2 ~ $ etcdctl cluster-health
member 1f3cc12eb9b21ae5 is healthy: got healthy result from http://10.15.4.183:2379
member 75d221fd9d70367e is healthy: got healthy result from http://10.15.4.182:2379
member f524d614bc2458a4 is healthy: got healthy result from http://10.15.4.181:2379
cluster is healthy
If any node is not responding or the cluster isn’t healthy – stop! Fix those problems before attempting to upgrade.
etcd2 Shutdown and Data Migration
Once the cluster’s health has been verified, the first etcd node can be stopped and the existing etcd2 data migrated to the new etcd3 data store.
- Stop the existing etcd2 unit using the command systemctl stop etcd2 .
- Disable etcd2 from starting on boot using the command systemctl disable etcd2 .
- Take a backup of etcd2 using the command etcdctl backup –data-dir /var/lib/etcd2 –backup-dir /tmp/etcd2-backup . Copy the resulting backup from the server to a safe location.
- etcd v3 stores its data in /var/lib/etcd, however we need to copy our existing etcd2 data in to that folder. Remove the existing data in the folder using the command rm -rf /var/lib/etcd/*.
- Copy the etcd2 data into the freshly-emptied etcd3 data folder using the command cp -a /var/lib/etcd2/* /var/lib/etcd .
- Shut down the etcd node.
Migrating from Cloud Config to Ignition
etcd2 clusters were normally configured using Cloud Config, a simple human-readable format that could be passed to a CoreOS instance to configure it. However, Cloud Config has a few drawbacks (for example, because it runs reasonably late in the system boot process it can’t configure low level items such as network configurations on the first boot). As a quick primer on Ignition, it is a JSON-formatted configuration that is read and processed extremely early in the boot process – specifically in initramfs before the main system boots. Unlike Cloud Config, it is only ever run on the host’s very first boot – on subsequent boots it won’t be run. As it runs before the main system boots and runs only once it can be used to perform operations that simply aren’t possible in Cloud Config – such as re-partitioning the underlying disk.
Although Ignition configurations can be written manually, CoreOS instead recommends writing configurations in the Container Linux Config format and then using the Container Linux Config Transpiler to convert them to Ignition. The Container Linux Config format is a YAML formatted file, similar to (but not identical to!) the Cloud Config format.
For anyone used to writing Cloud Config configurations, using Ignition instead may seem like an extra hassle. However, etcd3 on CoreOS Container Linux can only be configured using Ignition – there is no support for Cloud Config.
With that primer out of the way, the next step is to write the Container Linux Config/Ignition configuration for the etcd node. Assuming that this node only runs etcd, it can be simplified to something similar to the following;
passwd:
  users:
    - name: core
      ssh_authorized_keys:
        - "ssh-rsa AAAAB3NzaC1yc2EAAAABJQAAAgB6nllpba2jCHIR3Ud4LlZA/ms43mJlIr8UuJ2tt/mAHUR0Yv4OnKg8HBP8+X3ji500EspiRfmNp/YSPpJki67KAub73b96TTzMMaC5BbYPAocuJwdZvetgKxa0RkBvEZEfIwuJsKBs1jpydrb1HM8L7In1ABXhmq+bY3J3tq/brvPY3xdbtNIxrAguIyYIY5I6nvLKTmMWd6mf7XPXcxP02Fpqt1yGbFZbgPzMYp9T568NXLw17yaZN+p8Id5EfSI1ecBp/BL5+Yc2YvyXSg8HftYVa/xCKEEWN0YlOMzzo80BVB6GHAWFnoMstXCXsvOiHJhBPhwAMWWLrSaDo8eGWfTnfuHVq/TH6ZRayF/Q5DqilhymRJl0wUm0sMvioRd1fCwBsFfOBUs3vEIxwDPldrI+b7l+fAZnAxnzUc0NG9aLj7/llWPLLoEYNfSw8e8WX7SudG7fiJjRz1ewuri6KMWOPGqyGDQ359m4UyCBieQjbVPXqldi3C3Paz5EtehQLolb5y90Npc3k0cCLvFXBU+D5BXl2Dnp6C0oQFpRbTHKPg+KDxxrC42mv1ej7tAvkq0j0vcFsYACE5rVOGDsUtY9Bqxx+6hT2dyhC8G8OdclB17AaIFHvNEGSGw9EW98pWjyctXV/yx+M5poidCGWNwFmp3uCDE44Hm21ZnBiw== kj"
etcd:
  name: etcd1
  listen_client_urls: "http://0.0.0.0:2379"
  listen_peer_urls: "http://0.0.0.0:2380"
  advertise_client_urls: "http://10.15.4.181:2379"
  initial_advertise_peer_urls: "http://10.15.4.181:2380"
  initial_cluster:             etcd1=http://10.15.4.181:2380,etcd2=http://10.15.4.182:2380,etcd3=http://10.15.4.183:2380
locksmith:
  reboot_strategy: "etcd-lock"
This configuration adds a SSH key to the core user (so you can access the console if you need to troubleshoot something), configures etcd’s listening and advertisement addresses and uses locksmith to handle automatic reboots without compromising the cluster’s availability. (Note: this configuration configures etcd to use HTTP for communication instead of HTTPS. For new deployments, HTTPS is suggested. For existing HTTP deployments, it is suggested to upgrade to etcd3 and then convert to using HTTPS).
Once the Container Linux Config has been written, use the Container Linux Config Transpiler to convert it to an Ignition configuration. The Container Linux Config Transpiler can either be compiled from source or binaries for multiple platforms are available on the Releases page. To run the Container Linux Config Transpiler just run the command ct –in-file CONFIG.CT , replacing CONFIG.CT with the path to the Container Linux Config written earlier. The Container Linux Config Transpiler will then output the Ignition configuration – copy and save this somewhere.
Finally, don’t forget to remove your old Cloud Config configuration to prevent it from being executed on future boots.
Provide the Ignition Configuration to the etcd Node
Just like with Cloud Config, we need to provide the Ignition configuration to the node so it can read and parse it. This will vary heavily depending on the platform you have deployed CoreOS Container Linux on. CoreOS’s documentation on Ignition Support Platforms will guide you through the process of supplying the Ignition configuration to your node.
Although I use VMware for my CoreOS Container Linux nodes, and successfully use VMware’s Guestinfo interface to supply Cloud Config, I was unable to successfully supply the Ignition configuration to the VM using this method. Instead, I am using the iPXE method with a twist – using the coreos.config.url Kernel parameter to supply a HTTPS URL where the Ignition configuration can be downloaded from.
Boot the Node
Ignition is only run on the first boot and will not be run on subsequent boots. As this is an existing etcd node, by default our new Ignition config that configures etcd3 won’t be run. Therefore, we need to explicitly tell CoreOS Container Linux that this is the first boot of the node and to run the Ignition configuration. Be very careful here – if your Ignition configuration carries out destructive operations such as disk repartitioning you will likely experience data loss. With the Container Linux Config example listed previously that only configures a SSH key, etcd3 and Locksmith data loss shouldn’t occur – but caution is still advised. A previous step said to take a backup of etcd2 and transfer it off the node – if you didn’t perform that step you would be well advised to go back and perform that now!
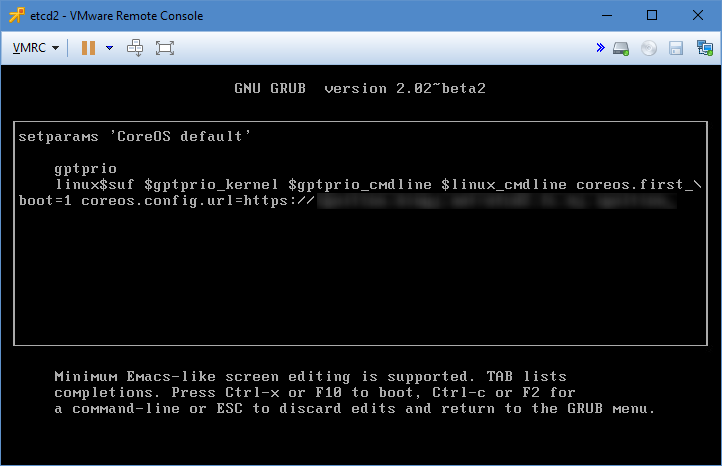
To override the first boot detection and run the Ignition configuration, a Kernel parameter will need to be supplied. To do this, press e when the GRUB boot menu is displayed. The timeout on the grub menu is very short (1 second) so you will need to be very quick. Once you are in the editing interface the GRUB boot entry, append coreos.first_boot=1 to the kernel line and press F10 to boot using it.
Enable etcd-member (etcd3)
Although the systemd etcd-member unit is enabled via the new Ignition configuration, as it was previously disabled it will need to be explicitly enabled. Run the command systemctl preset-all to ensure that all systemd units are reset to their vendor state – which for etcd should be ‘enabled’ because of the Ignition configuration. Once complete, reboot the node so that the etcd-member unit starts.
Health Check
Now that the etcd3 is running (under the etcd-member unit instead of etcd2), we need to ensure that the cluster is still in a healthy state. As before, run the command etcdctl cluster-health . The output should confirm that all nodes are responding and that the overall cluster health is healthy.
core@etcd2 ~ $ etcdctl cluster-health
member 1f3cc12eb9b21ae5 is healthy: got healthy result from http://10.15.4.183:2379
member 75d221fd9d70367e is healthy: got healthy result from http://10.15.4.182:2379
member f524d614bc2458a4 is healthy: got healthy result from http://10.15.4.181:2379
cluster is healthy
If any node is not responding or the cluster isn’t healthy – stop! Check the etcd-member logs using the command journalctl -e -u etcd-member to try and find out why the cluster isn’t healthy.
Verify also that the etcd node is a v3 node instead of v2.3 as before using the command curl http://localhost:2379/version . The output should confirm that etcdserver is 3.x.x but that etcdcluster is 2.3.x. It is normal and expected for etcdcluster to be reporting 2.3.x – as although the etcd server is now at version 3, the cluster’s version will not be upgraded to version 3 until all nodes in the cluster are running etcd server version 3.
Upgrade Remaining Nodes
On the next node in the cluster, start over at the initial Health Check step and perform all of the upgrade steps on that node.
Verify Cluster Upgrade
Once all of the etcd nodes have been upgraded, the cluster should be automatically upgraded to etcd3. To verify this;
- Check the etcd server and cluster version using the command curl http://localhost:2379/version . It should report that both etcdserver and etcdcluster are now at version 3.x.x.
- Check the etcd-member unit logs using the command journalctl -e -u etcd-member . The following lines should be present indicating that the cluster has been upgraded;
Apr 22 13:54:19 etcd3 etcd-wrapper[817]: 2017-04-22 13:54:19.575893 N | membership: updated the cluster version from 2.3 to 3.0
Apr 22 13:54:19 etcd3 etcd-wrapper[817]: 2017-04-22 13:54:19.577194 I | api: enabled capabilities for version 3.0
Restart Kubernetes
Now that the etcd cluster has been successfully upgraded and is healthy, the Kubernetes masters and workers can be re-started again. Verify that they successfully connect to the etcd cluster and work as intended. If all is good, you’re now ready to upgrade Kubernetes to 1.6!


